|
"Spacey-looking, really cool. I showed them
to all my friends."
Beckah, 15 |

|
Product Support
Insertion Instructions
The Classic: Closed Model – Class II Correction
- For expected treatment time longer than three months, arch wire must be 16x22 and palatal transarch stabilization is recommended.
For treatments exceeding five months, banding of maxillary second molars is beneficial.
- Place desired torque in arch wires, depending on anchorage needs. Mandibular anterior labial root torque
and maxillary posterior buccal root torque are commonly used.
- Select the proper length Eureka Spring and convert to a left or right
and slide the ram portion onto the mandibular arch wire. Insert and tie in both arch wires.
- Slide the same length molar assembly over the plunger assembly, and with the patient’s mouth open,
insert the attachment wire, from the distal, through the molar tube.
- Grab the attachment wire with pliers as it protrudes from the mesial end of the molar tube.
With the pliers appropriately positioned, and the mouth closed, rotate the pliers so that the molar
assembly is to the buccal and in the same plane as the molar tube. Without releasing the attachment wire,
pull the molar assembly forward until 1-2 mm of free distance remains and
then make the appropriate bend in the attachment wire.
- Tie down and back the ram of the plunger assembly at its neck. Tie the attachment wire to
the molar hook.

Demonstration
Eureka Spring Class ll Classic Insertion Procedure
Assistance
Troubleshooting Support
The Classic: Closed Model – Class III Correction
- For expected treatment times longer than three months, minimum, arch wire size must be 16x22.
Lower first molars must have a molar tube of at least .036 diameter (can use an upper first molar attachment spot welded to a
lower molar band, with the tube always to the gingival – (an auxiliary attachment sliding on the arch will be available in a few months).
For anticipated treatment time exceeding five months, a lingud arch and/or banding/bonding of mandibular second molars is recommended.
- Place desired torque in arch wires depending on anchorage needs. Maxillary anterior labial root torque and mandibular posterior
buccal root torque are commonly used.
- Select the proper length Eureka Spring (generally the 20 mm length is used) and convert to left or right such that the anterior
most edge is always gingival. Slide the ram portion onto the maxillary arch wire. Frequently the ram will be just at the mesial
edge of the cuspid bracket.
- Slide the same length molar assemble over the plunger assembly and with the patient’s mouth open, insert the attachment
wire, from the distal through the molar tube.
- Grab the attachment wire with pliers as it protrudes from the mesial end of the molar tube. With the pliers appropriately
positioned and the mouth closed, rotate the pliers so that the molar assembly is to the buccal and in the same plane as the molar tube.
Without releasing the attachment wire pull the molar assembly forward until 3 mm of free distance remains and then bend the attachment wire
sharply upward at the mesial corner of the molar tube.
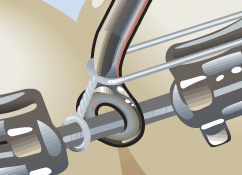
- Using an 014 ligature wire tie up and back the ram of the plunger assemble to the molar hook.
There is no need to ligate the attachment wire.
Demonstration
Eureka Spring Class lIl Classic Insertion Procedure
Assistance
Troubleshooting Support
The Quick Connect – Class II Correction
Although some clinicians are using the Quick-Connect for class III corrections, it is recommended that the Classic model be placed for Class IIIs.
- Arch wire sized, torques, Eureka Spring lengths, and the molar attachment procedures are similar to those for the Classic model.
- Reduce the length of the short arm of the Allen wrench to 3 mm, and then clamp the long arm with a Matthiu needle holder
in such a way that the long arm is parallel with the Matthieu, with only 3-4 mm extending past the beaks.
- Place the hex screw of the block on the protruding end of the Allen wrench and use the Matthieu as the carrying tool
to insert the block on the arch wire.
- After making sure the arch wire slot on the block is fully engaged on the arch wire, gently and lightly tighten
the hex screw by rotating the Matthieu.
- An alternative method for inserting the block is to first place the it on the arch wire, hex crew gingival,
and then after shortening the short arm, attach the Matthieu to the long arm. With “touch-and-feel,” insert the Allen
wrench into the hex screw and gently and lightly tighten.
- To attach the plunger assembly to the sphere, place the large opening over the sphere. This large opening is now
facing lingually with the plunger assembly pointing anteriorly out of the mouth. Gently pull the plunger assembly forward,
then rotate it 180% distally in such a way that the plane of rotation is approximately parallel to the occlusal plane.
(The large opening is now the buccal.) In this position, it is impossible for the plunger assembly to be removed from the sphere.
If the 180-degree rotation is not performed, the plunger assembly will disengage from the sphere within a short time.
- Slide the plunger assembly into the molar assembly and follow steps 4 and 5 in the Classic model. Note: It is easy to
strip the threads on the screw or block when tightening. Use a light, gentle force just sufficient to completely seat the arch
wire into the blocks groove.
- Place a 012 or 014 ligature tie from the neck of the sphere or around the arch wire anterior to the sphere to a distal tooth.
This will serve as a tie back wire and also prevent the sphere from “crawling” anteriorly during mouth movements.
Demonstration
Eureka Spring Class ll Quick-Release Insertion Procedure
Assistance
Troubleshooting Support
|